Quick Start Guide
Set up your merchant account in a few minutes
- Log In: Access Helio with your wallet or email, and we’ll set up a Helio wallet for you.
- Settings: Verify your account and add merchant details.
- Wallets & Payouts: Add wallets, team members, and connect external payout wallets (e.g., multi-sigs, ledgers). You can also settle payment to fiat and auto-offramp to your bank account.
- Integrations & API: Configure API keys, Discord integration, and other features.
- Create Payment: Launch your first hosted Pay Link or Checkout Widget in a few clicks.
For Developers
- Embed and build custom Checkout Widgets to accept crypto payments in your app or website.
- Use the API to generate Pay Links and single-use Charges.
- Automate workflows by listening to webhooks for transaction confirmations.
- We also streamlined our onchain checkout flow into a Solana transaction router & trading API to help any app land transactions faster/more reliably and build your own swap widgets.
For Creators
- Quickly create Pay Links for subscriptions, pre-sales, gated payments, Blinks and more.
No-Code Integrations
- Easily integrate Helio with various e-commerce and digital platforms.
- Use the Solana Pay plugin for Shopify.
- Deploy the Helio Discord bot to assign roles or memberships to your community based on sales.
- Automate on-chain transactions and sync customer data in Google Sheets.
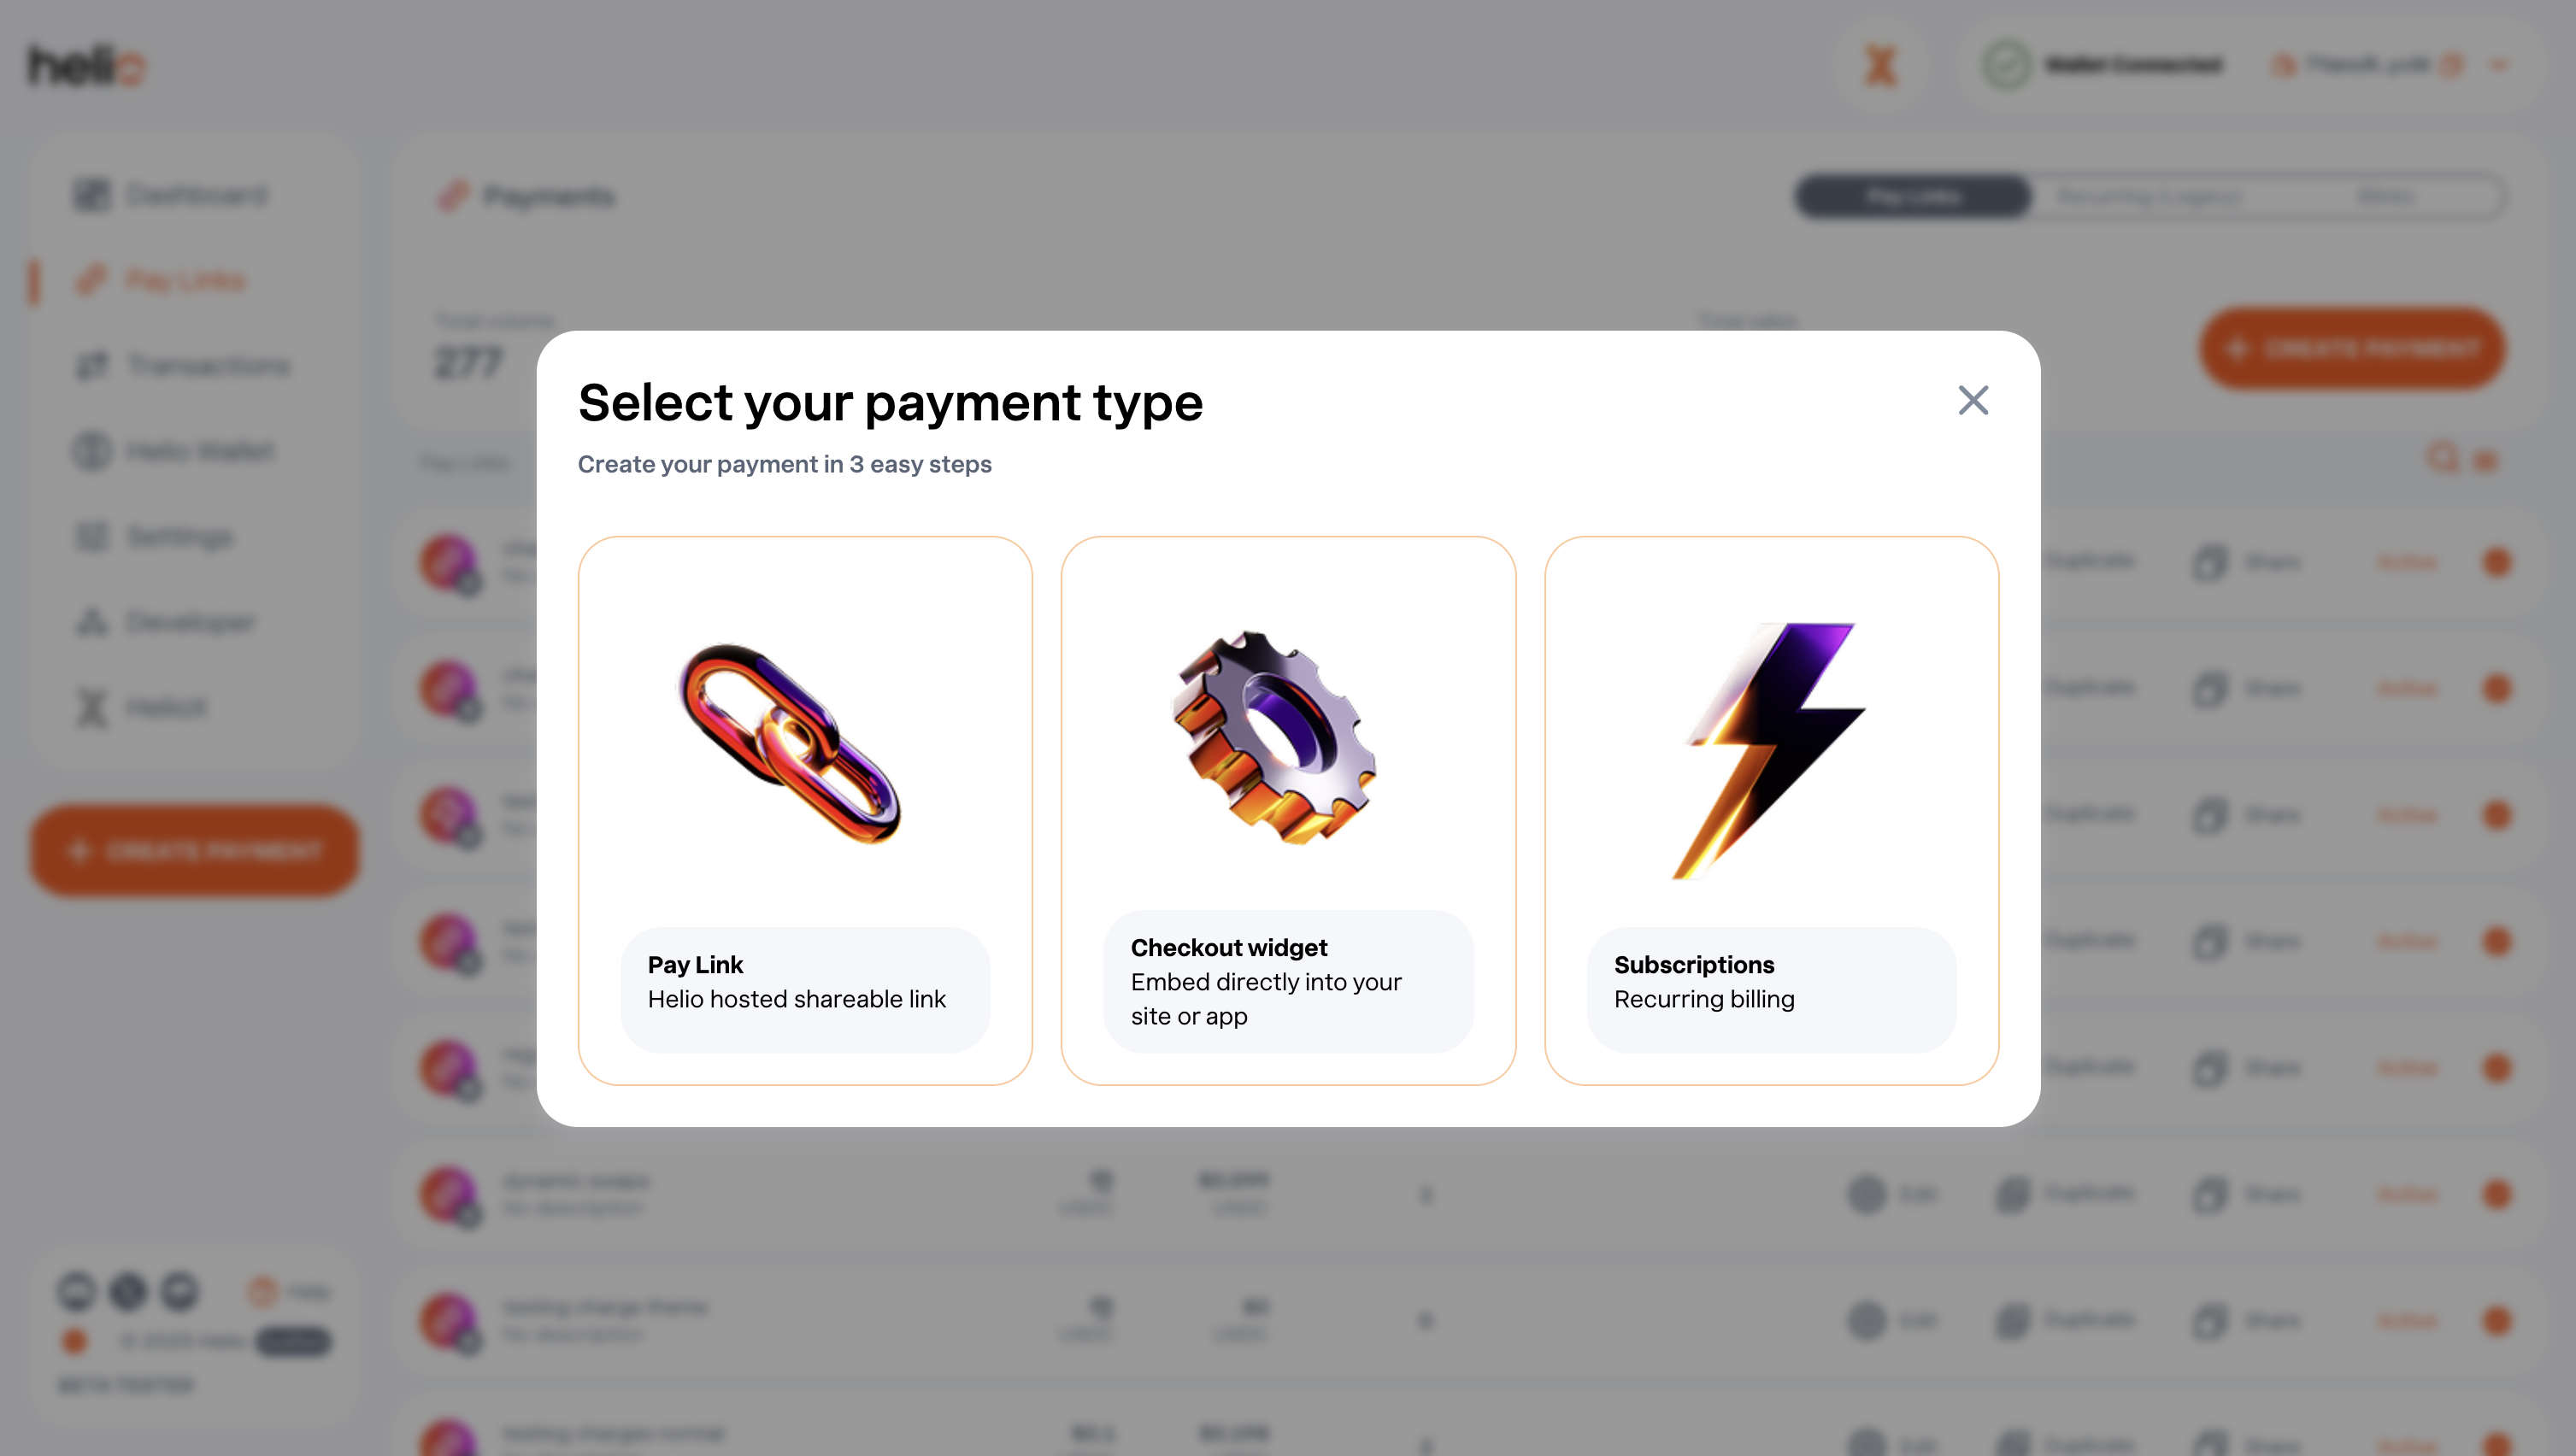
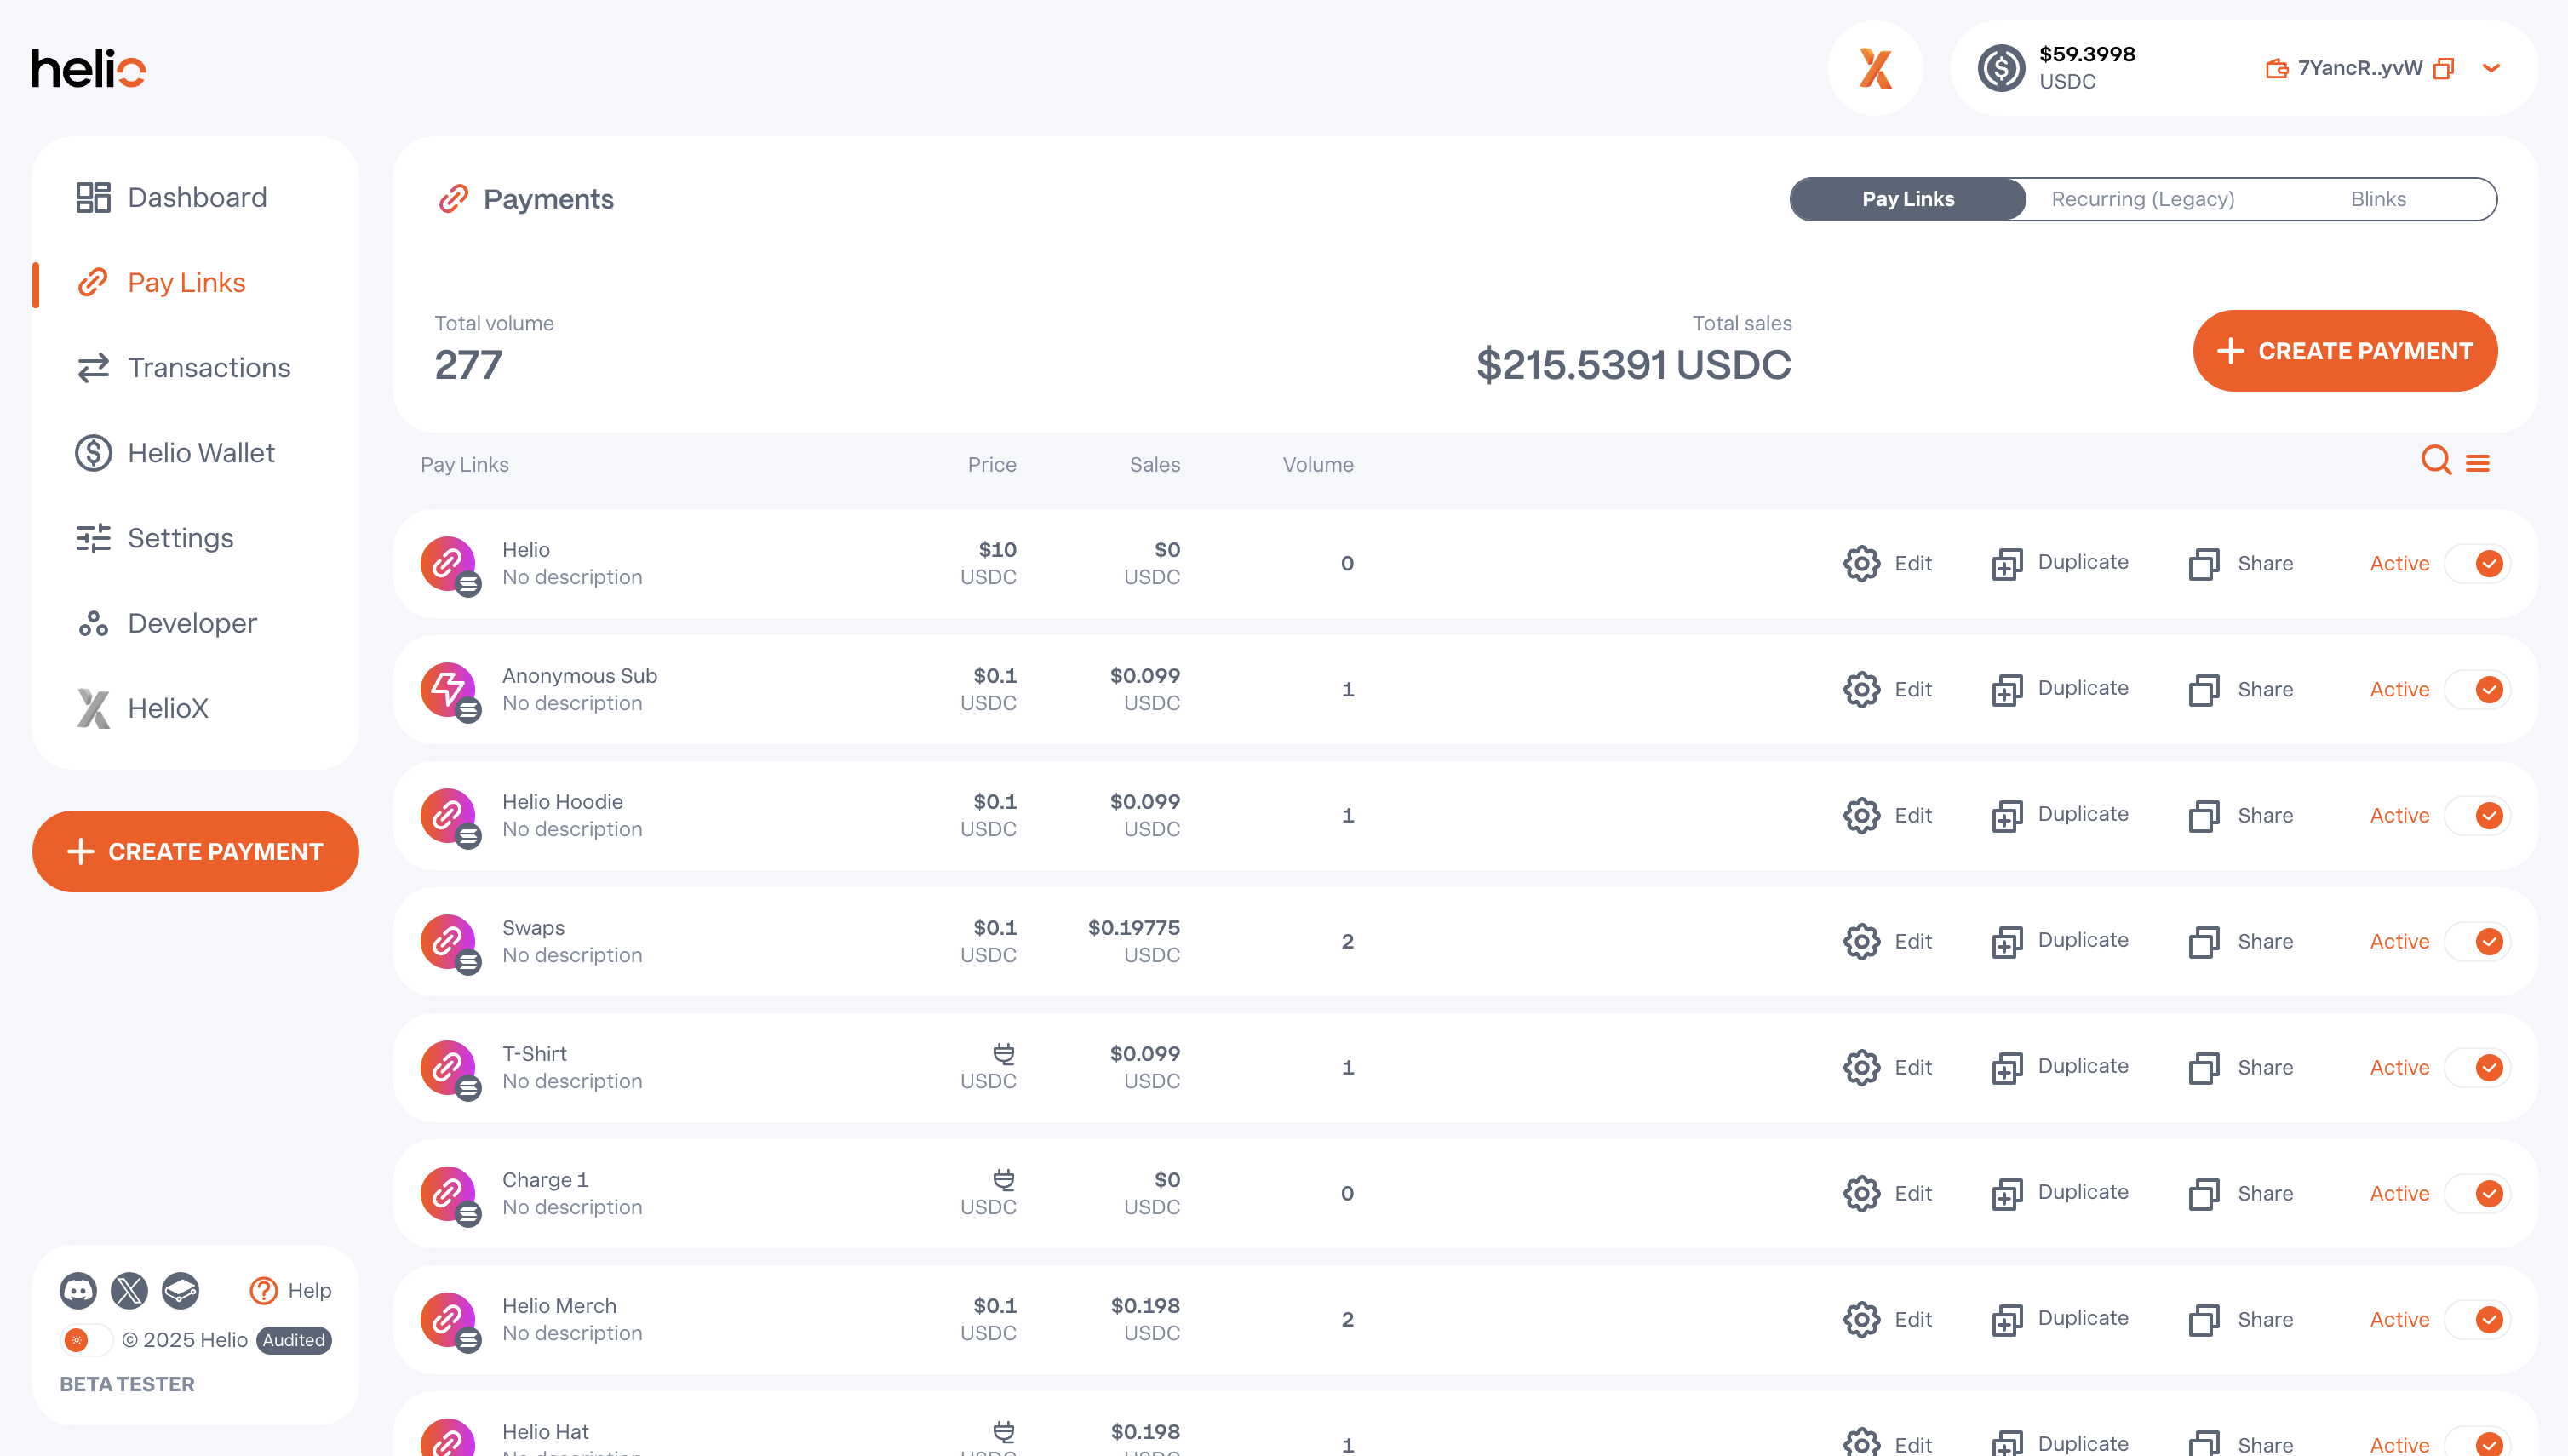
Create & manage Pay Links
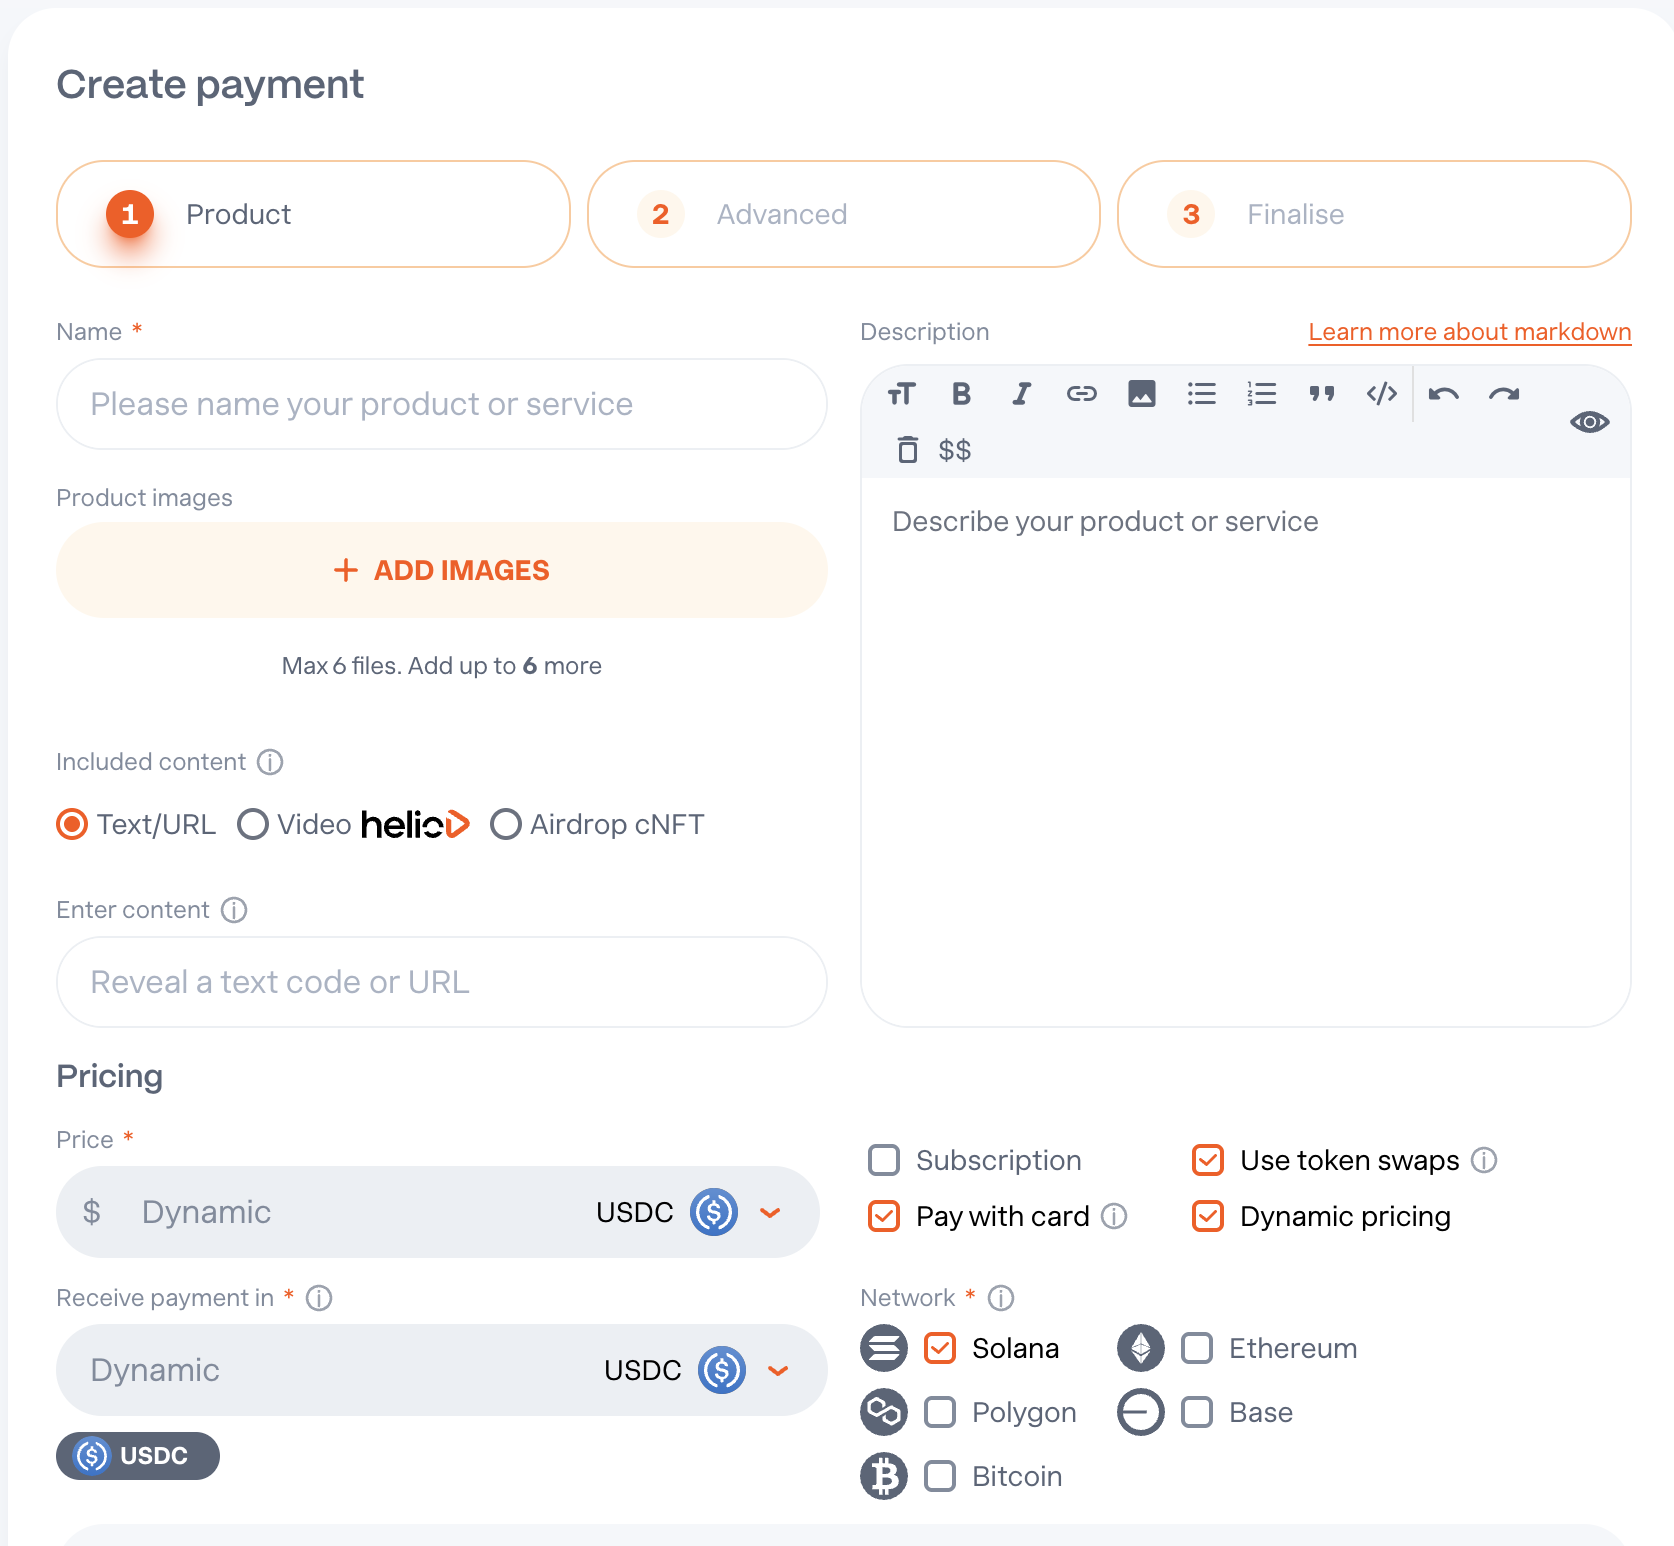
Select the Create Payment button to create a Pay Link, Checkout Widget, or Subscription.
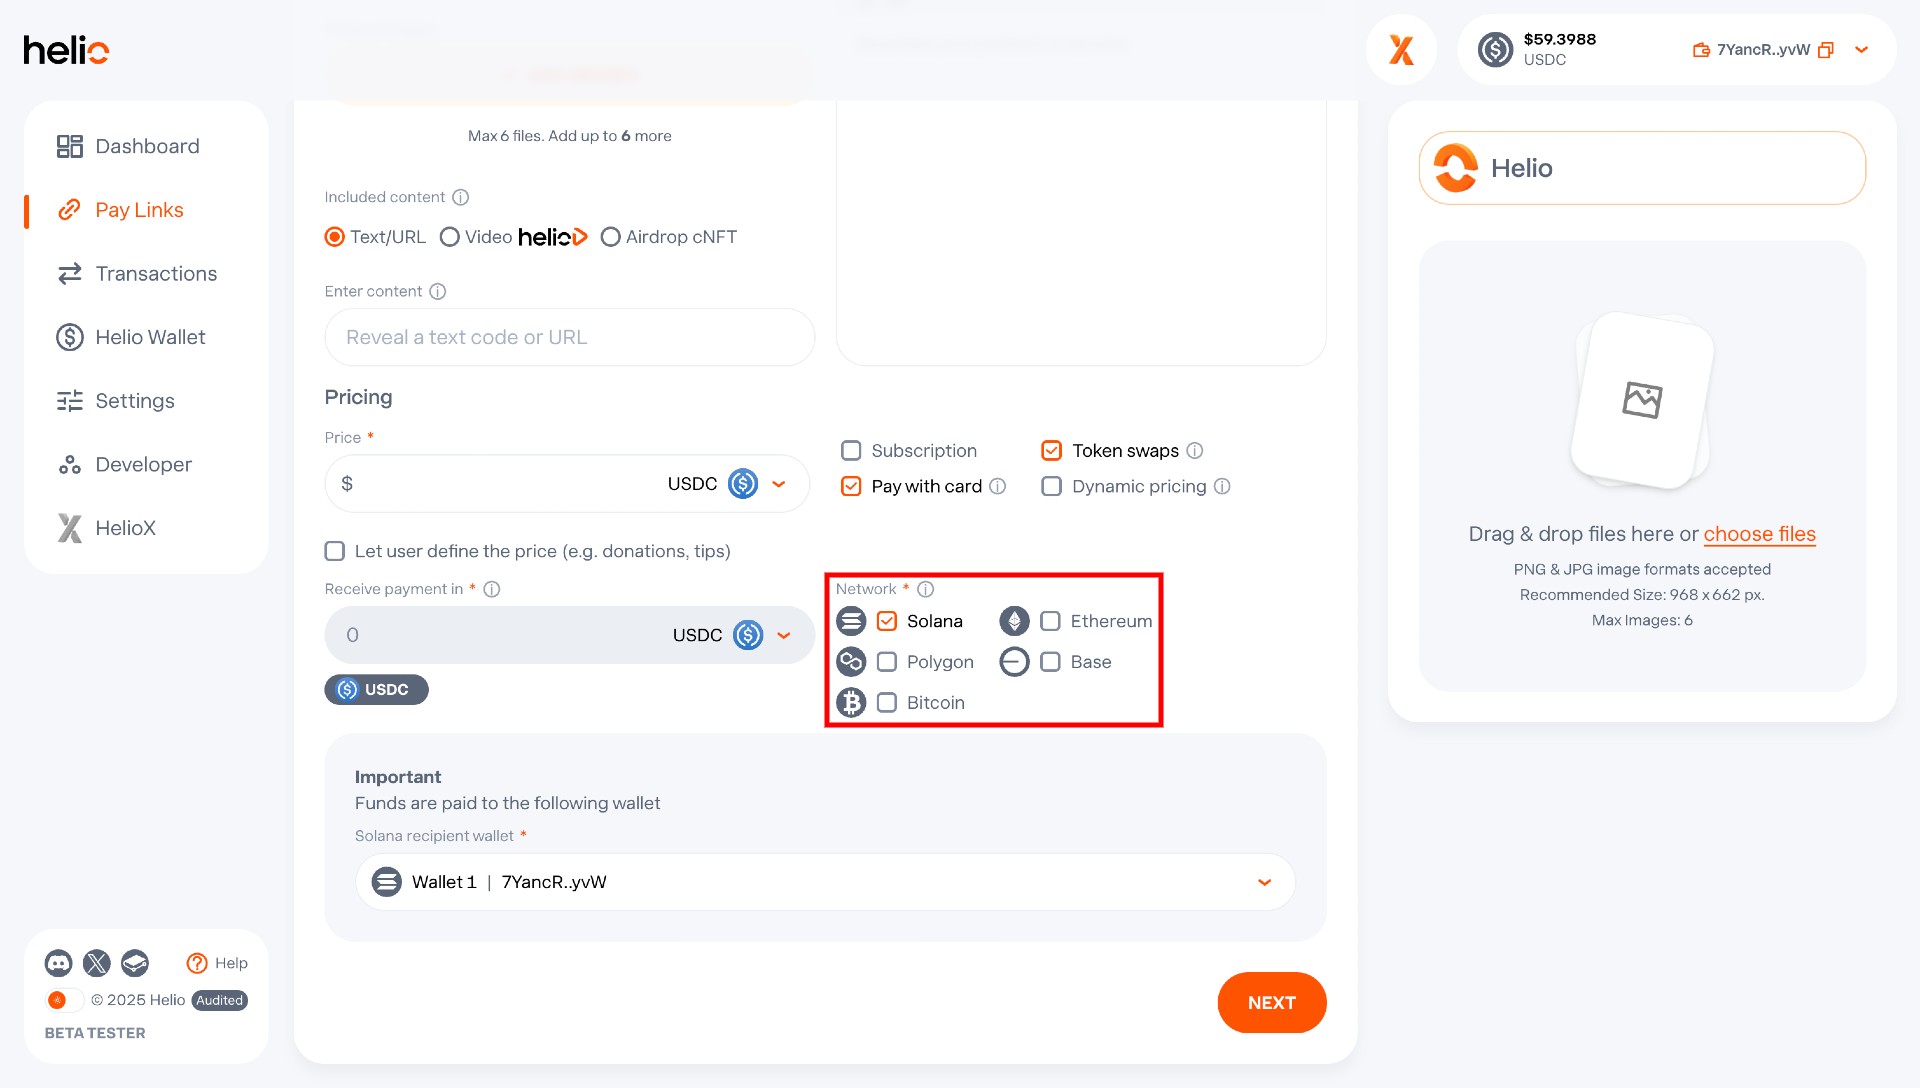
- Product: Set the product name, description, and image, as well as pricing, blockchains, payout wallets, and other options such as swaps, dynamic pricing, and pay with card.
- Advanced: Enable advanced options on your Pay Link, such as requiring customer information and shipping details, as well as discounts, split payments, memberships, access controls, notifications, and Stripe integration.
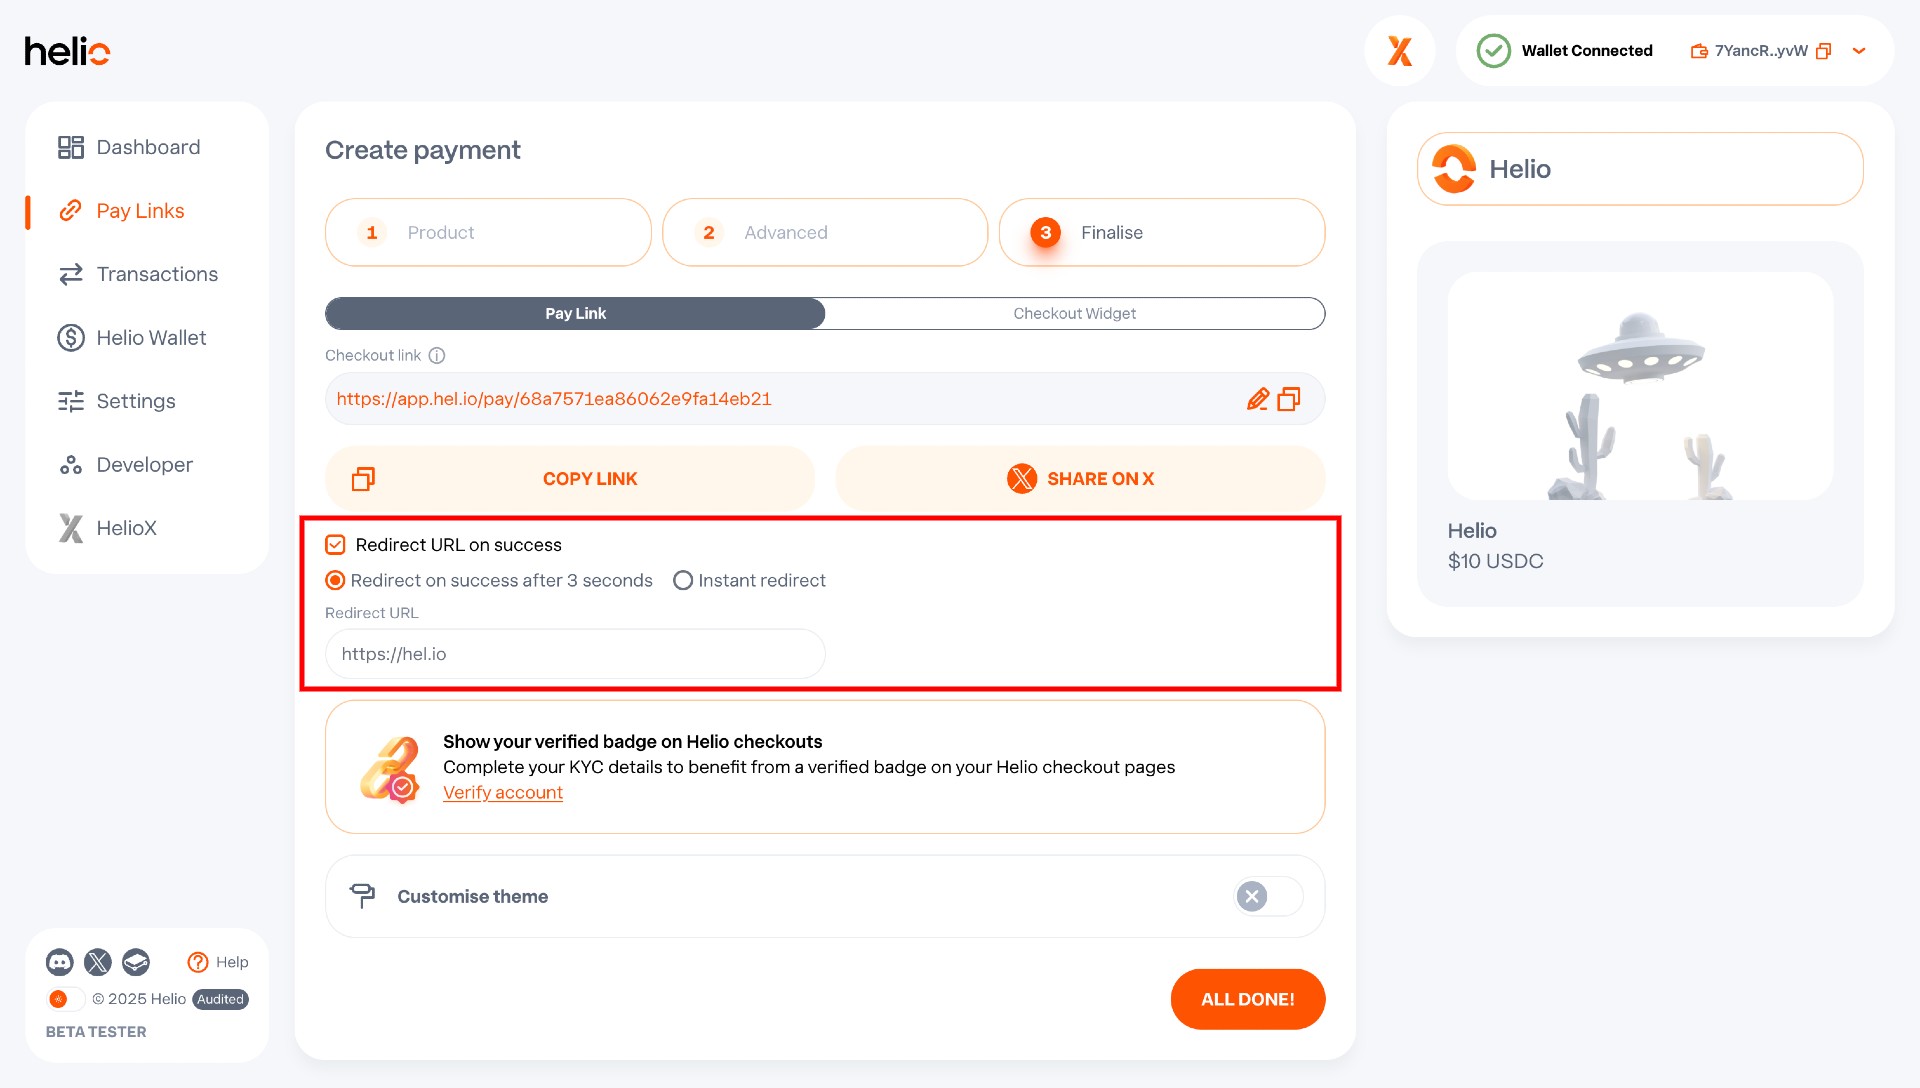
- Finalise: Finalise your Pay Link. Here, you can configure details like visual customisation, enable a redirect URL on payment success, and embed the widget if required.
Dynamic Pay Links
On Helio, you can create dynamic Pay Links. This is essentially a Pay Link with no set price upon creation. Instead, the price can be set programmatically, which is useful for checkout use cases or instances where a service has varying prices (e.g., subscription tiers).
A dynamic Pay Link can be created in two ways:
- Via the Helio Dashboard – In Step 1 of Pay Link creation, select Dynamic pricing within the Pricing section.
- Via the API – When creating a Pay Link using this endpoint, set
"dynamic": truein the request body. You can then programmatically set the price by creating a charge for that Pay Link and using therequestAmountparameter to specify the price.
Pay Link Customisation
In Step 3 of the creation process, you can fully personalise your Pay Link by setting the primary, neutral, and background colours, and choosing between light or dark themes. Your customisation will be applied to Pay Links, Charges, and Card Payment Pages.
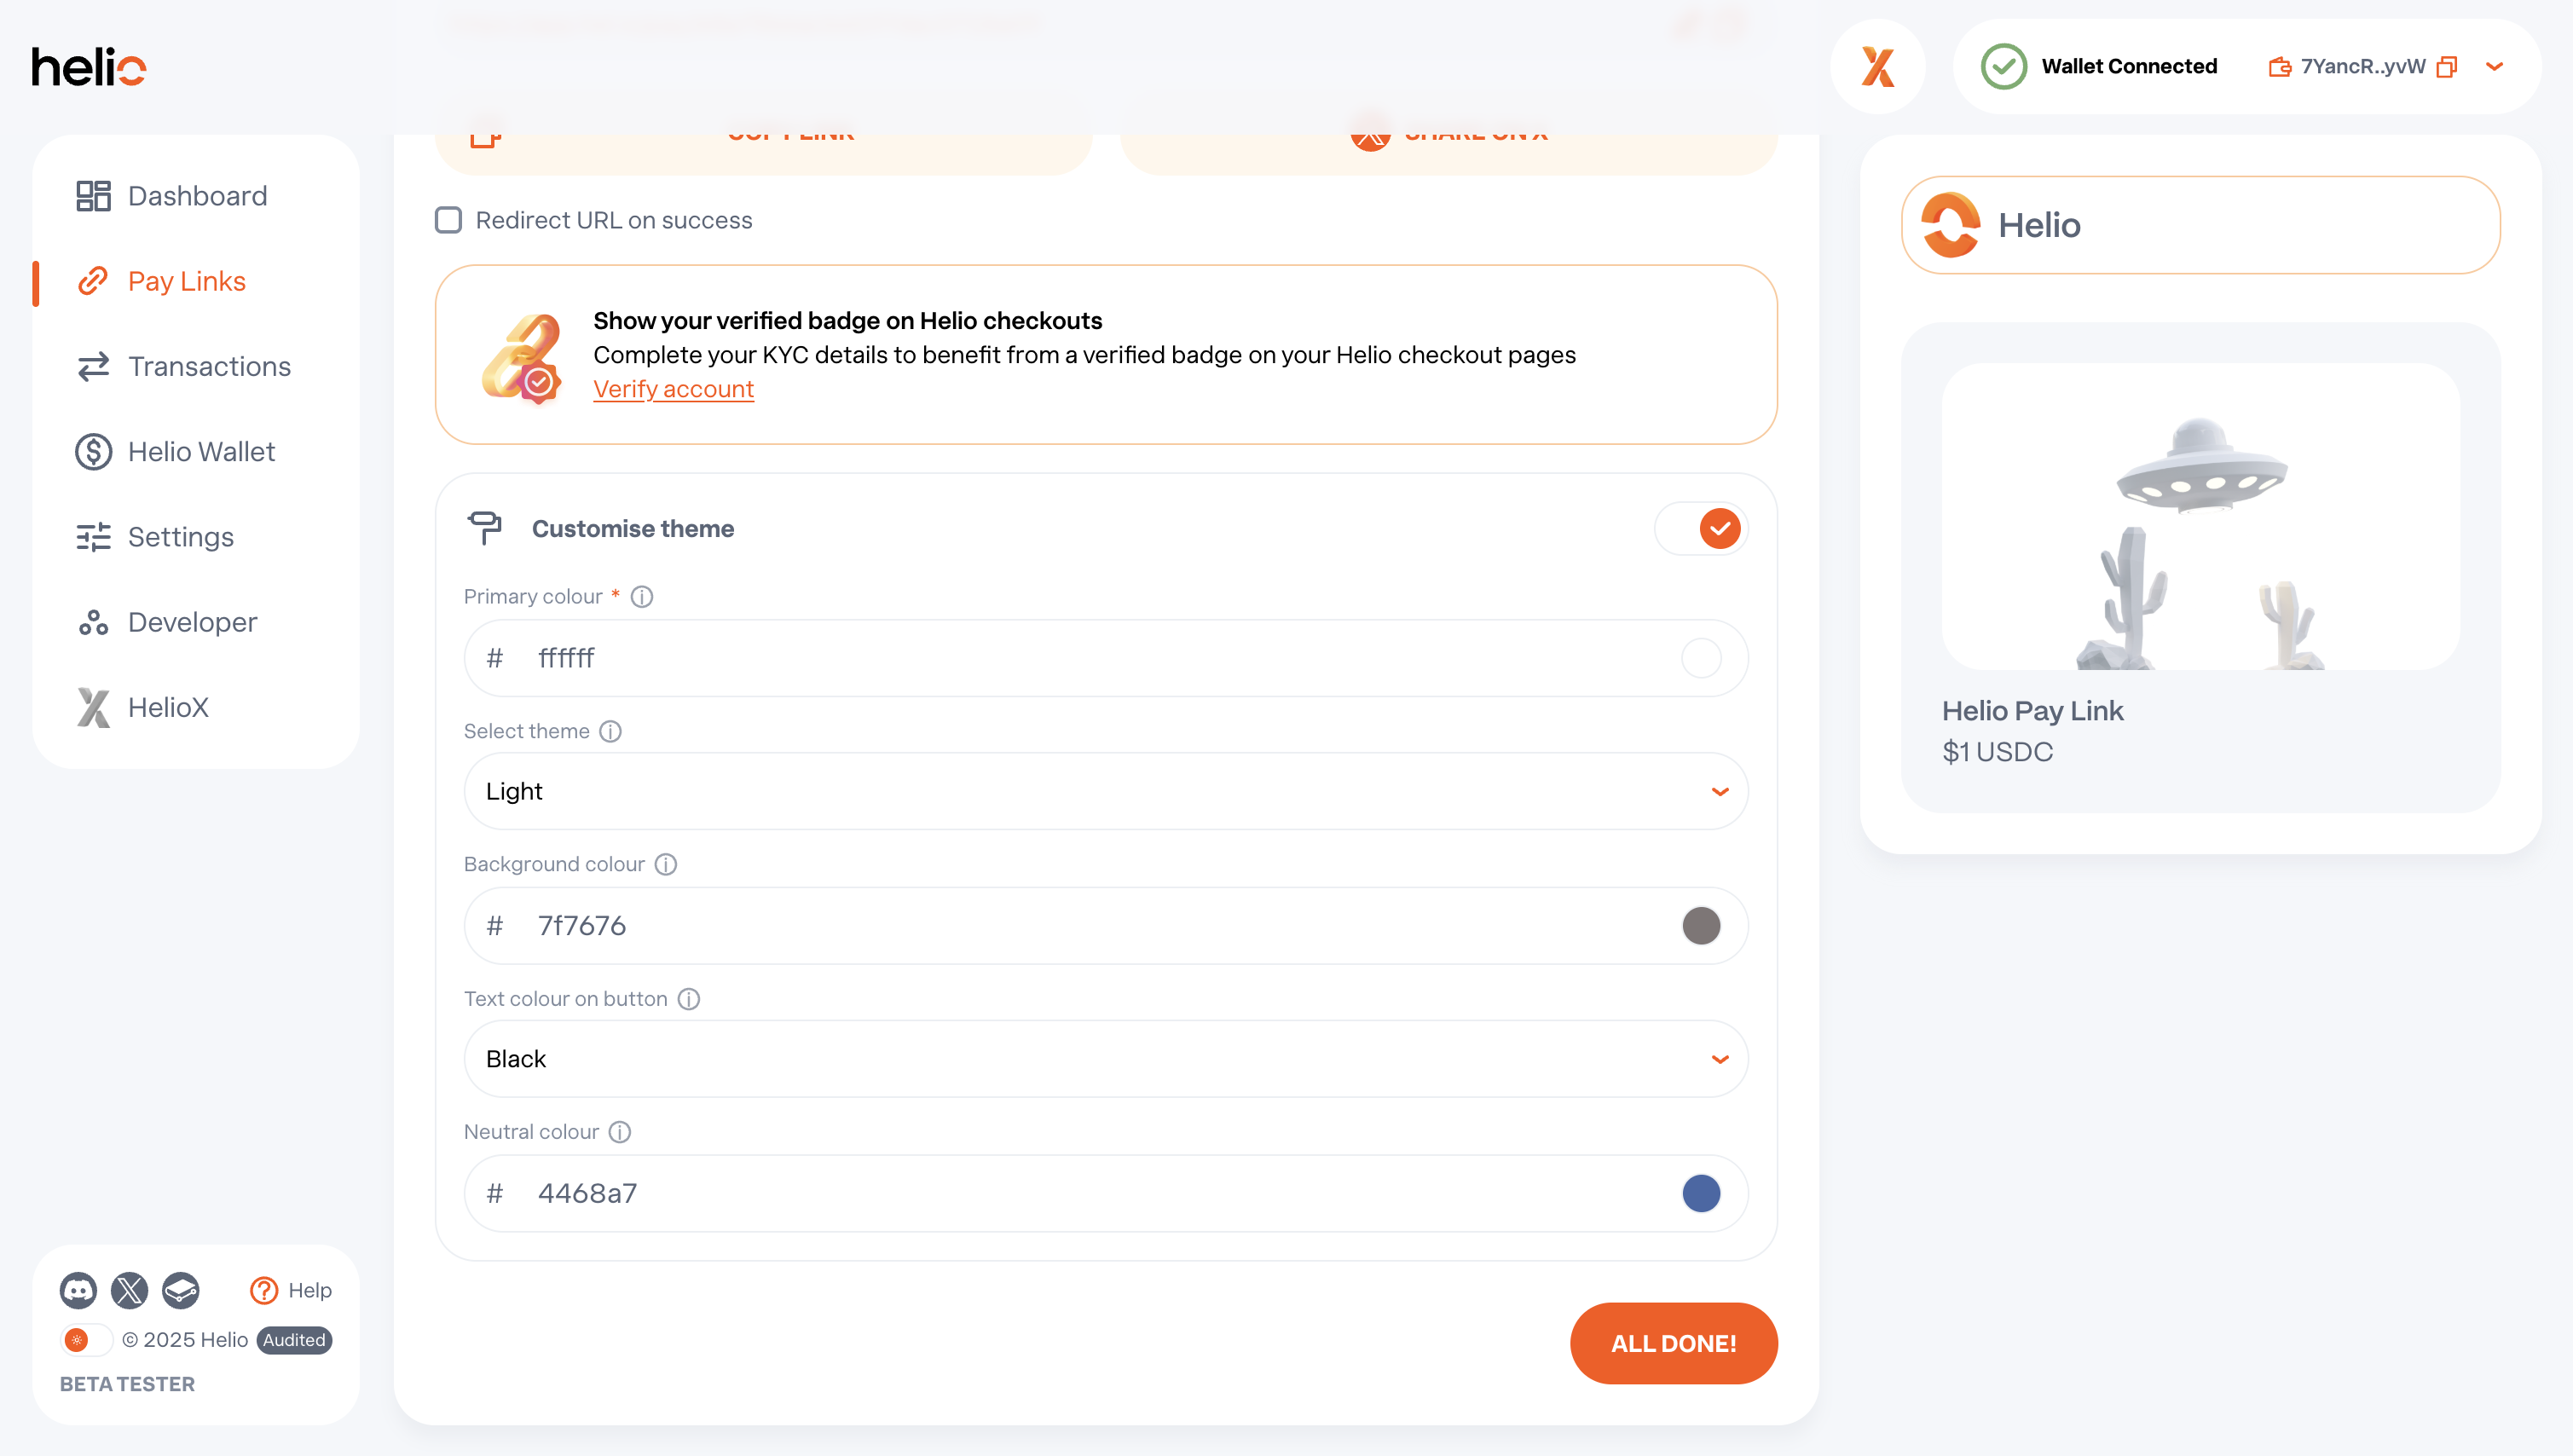
Redirect URL on Success
Implement a redirect URL on a Pay Link to send a customer back to your app or URL after payment.
Manage your Payments from the dashboard or select Pay Links from the left hand nav. Edit, duplicate, disable (and re-enable) and share payments.
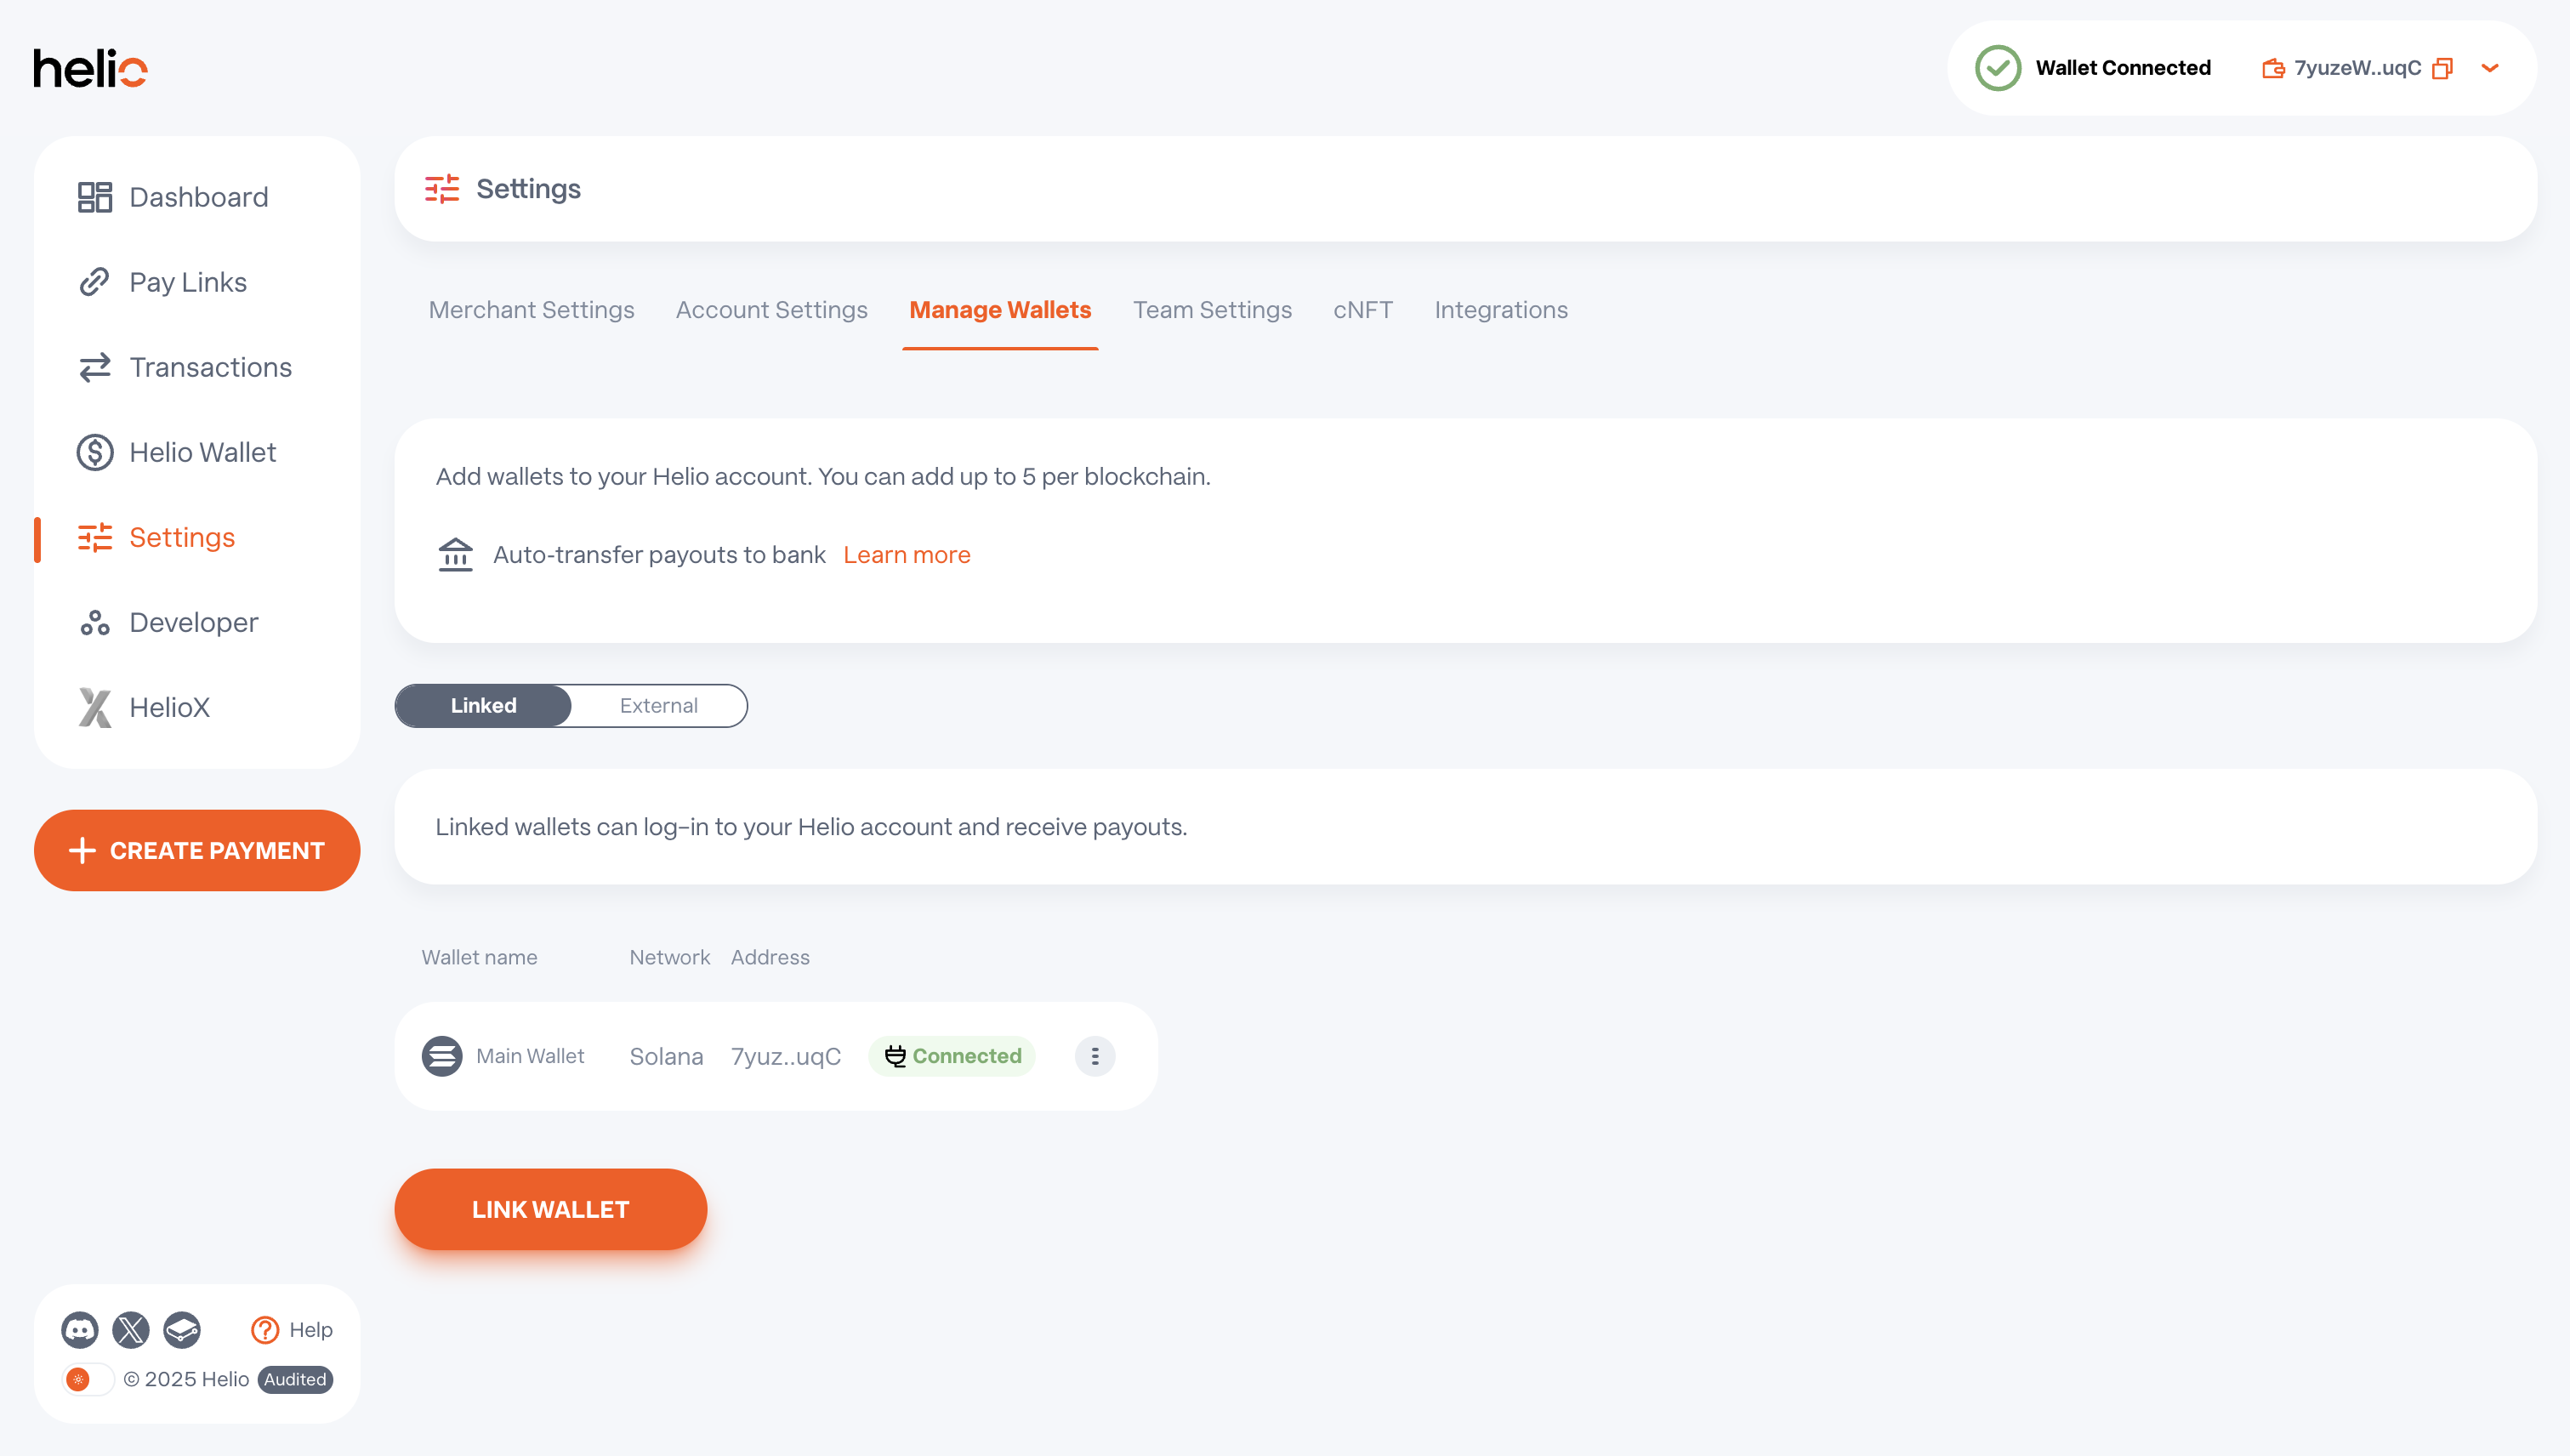
Managing Wallets
You can add a linked wallet - wallet connected directly to your Helio account - or an external wallet, which isn't directly connected to your Helio account (e.g. multi-sig wallet), by following the steps below:
Adding Wallets to Your Helio Account
- Go to Settings → Manage Wallets in the Helio Dashboard
- For linked wallets: go to the 'Linked' tab and click 'Link Wallet' to connect your wallet
- For external wallets: go to the 'External' tab and manually enter the wallet address
Adding and Choosing a Wallet for Payouts
- Within the dashboard, navigate to Settings → Manage Wallets, where you will find the option to add either a Linked or an External wallet. A linked wallet can log in to your Helio account and receive payouts, while an external wallet can only receive payouts.
- When creating or editing a pay link, navigate to the Pricing section and, in the wallet dropdown, select the wallet where you’d like to receive funds.
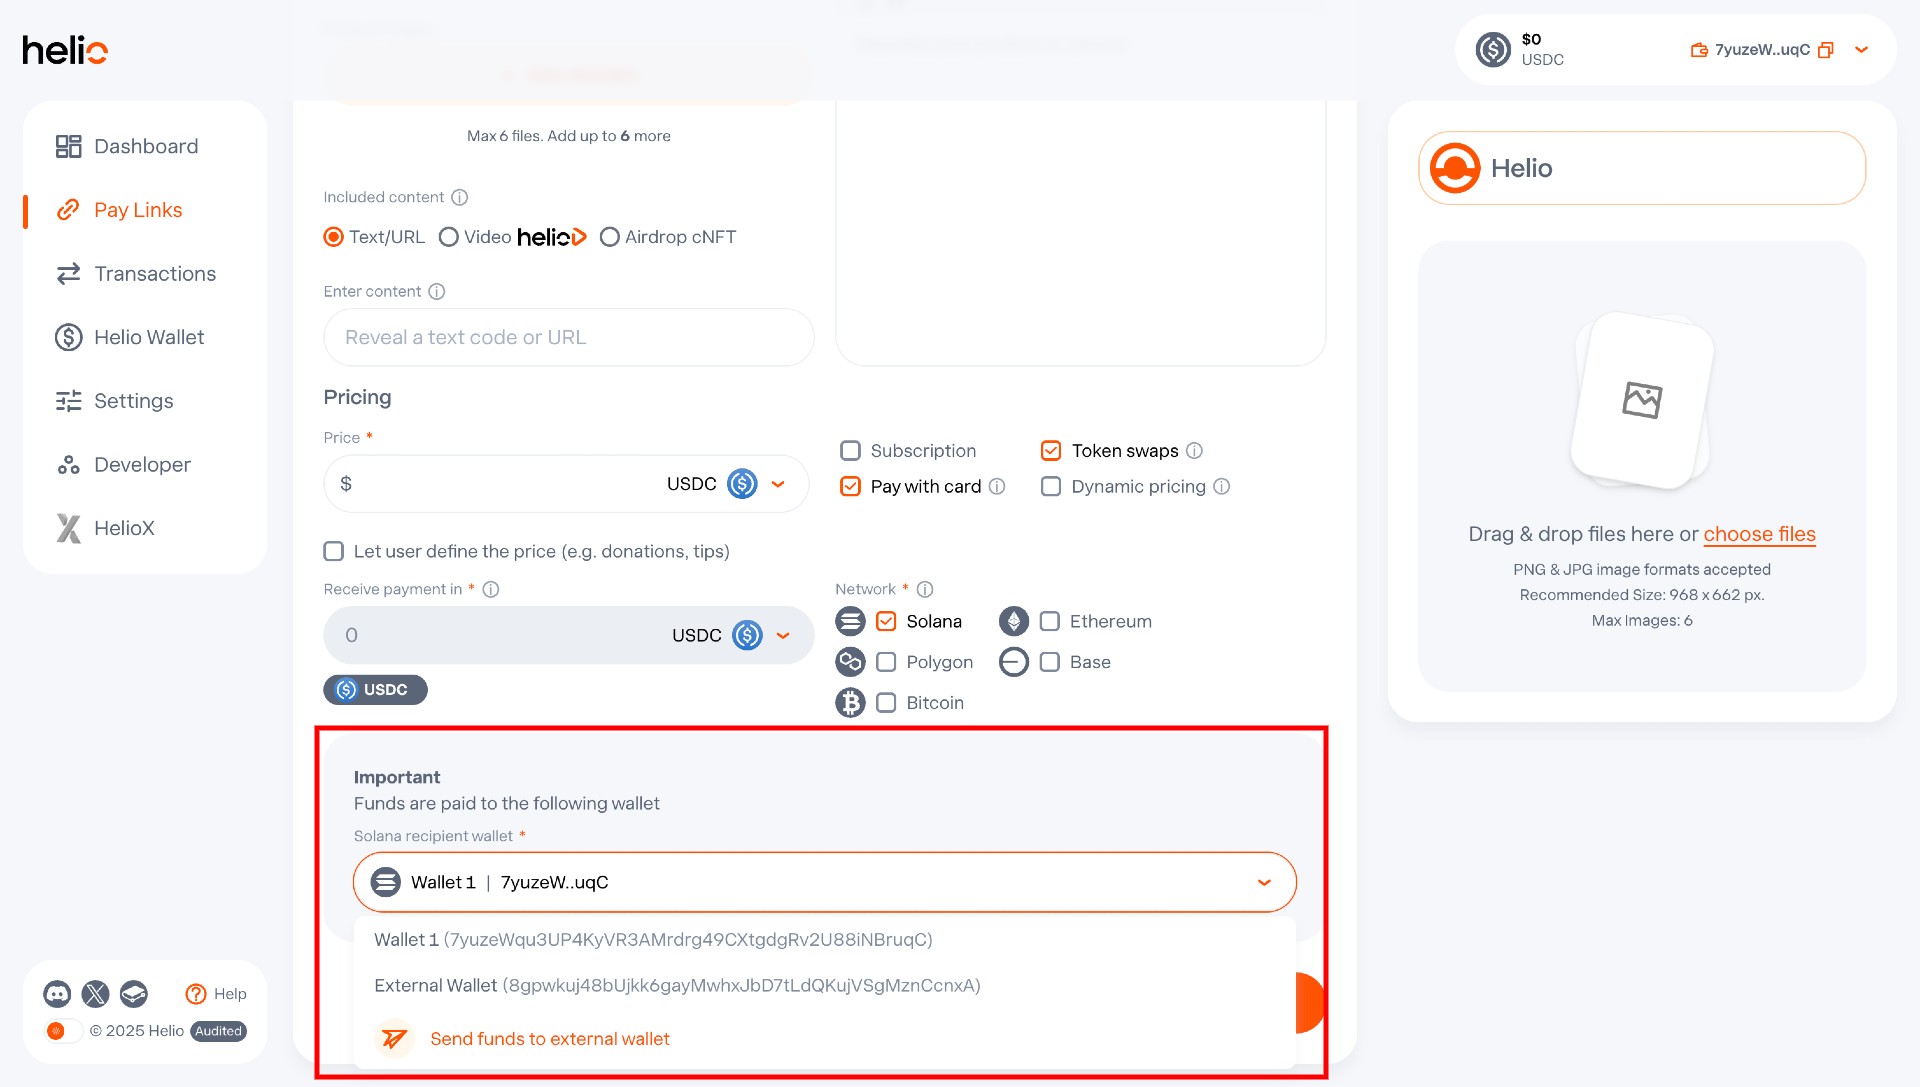
Enabling Multiple Chains
To enable multiple chains on a Helio Pay Link:
- Create or edit a pay link, go to Pricing Options, and under the Network section, select the chains you want to enable. We currently support Solana, Ethereum, Bitcoin, Base and Polygon.
Integration Into Apps & Websites
You can integrate into Helio into your apps & websites using the following options:
- Checkout Widget - Embed a Helio Checkout Widget with a few lines of code to accept payments in USDC and 100+ digital currencies.
- API - Use the Helio API to create payments, subscriptions, merchant accounts, and manage transactions.
- Webhooks - Set up webhooks to listen for Helio payment events and verify transactions in your application.
- Dynamic Pricing - Set a pay link price programmatically at checkout to support real-time pricing based on cart value, user input, discounts, or custom logic.
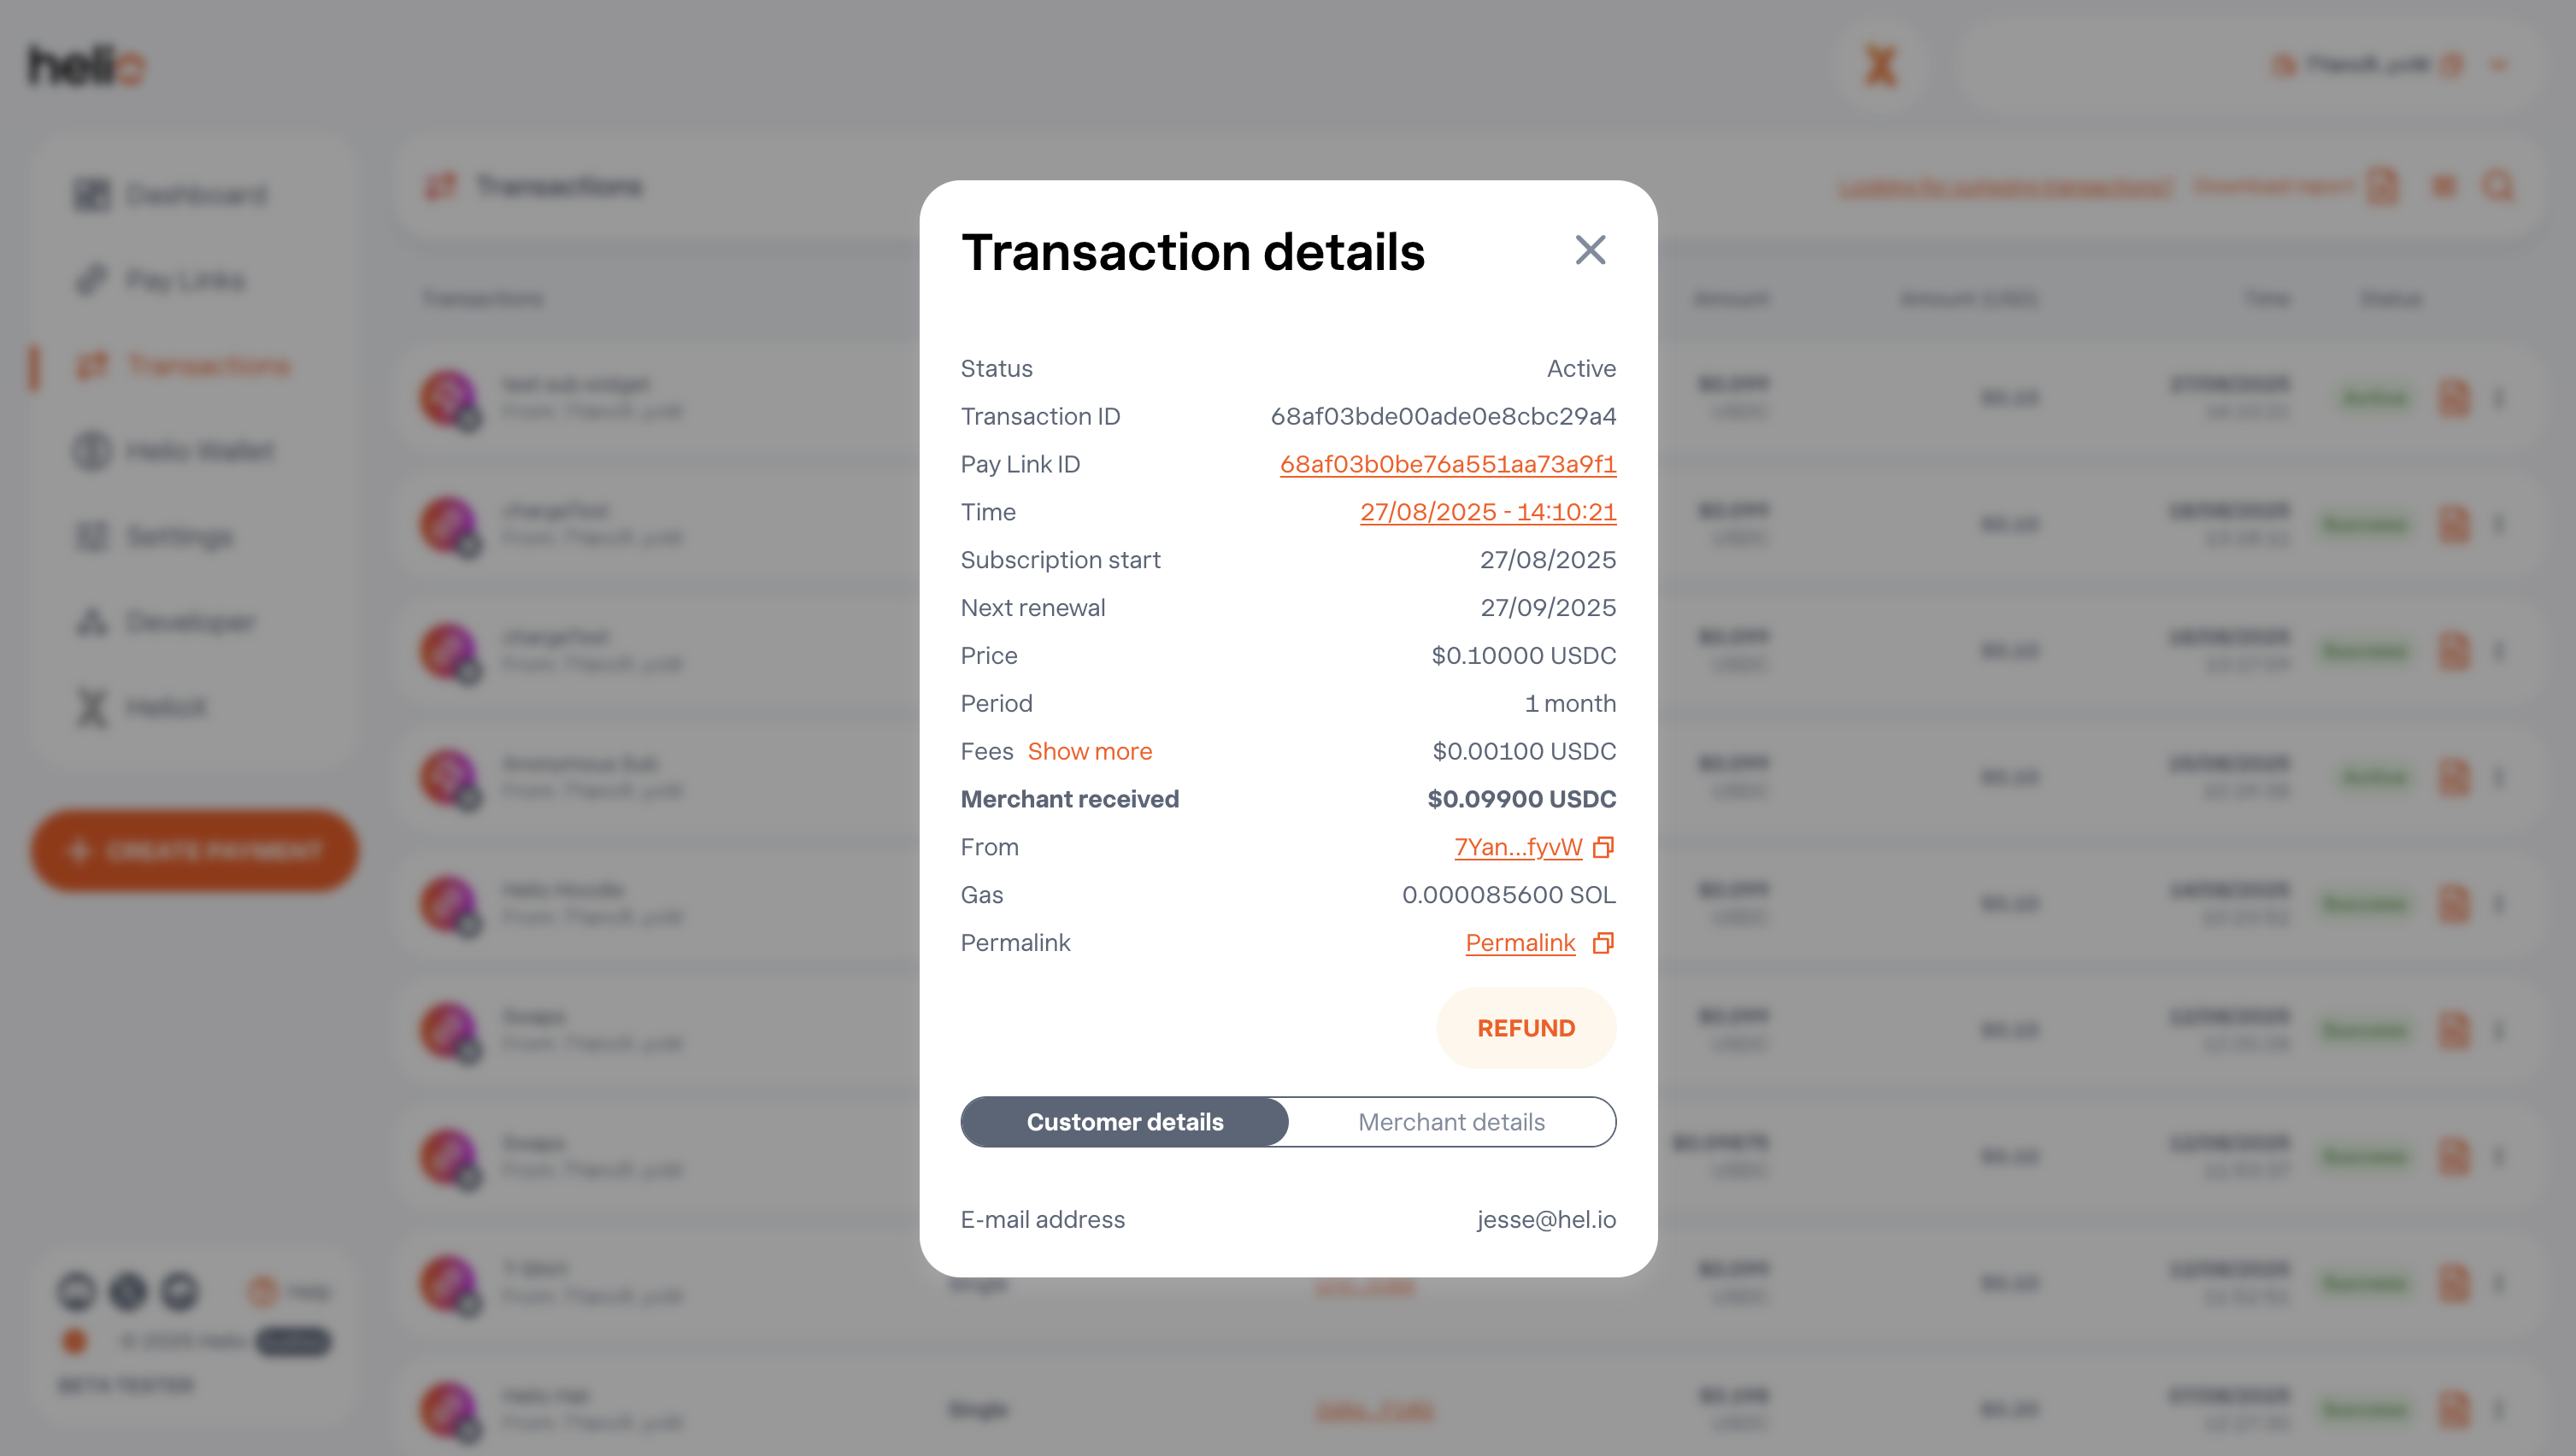
Transactions
Track and search all your incoming sales on the dashboard and enjoy a drill-down view by selecting Transactions from the left hand navigation. Each transaction has an associated receipt including all relevant customer details, a permalink and you can also process refunds directly from the receipt.
Data can be exported easily via CSV (hit Download report in top right), automated into a Google Sheet or export your transactions via API.
In addition, your customers can access their receipts and manage subscriptions directly from the Buyer Dashboard.
Updated 13 days ago